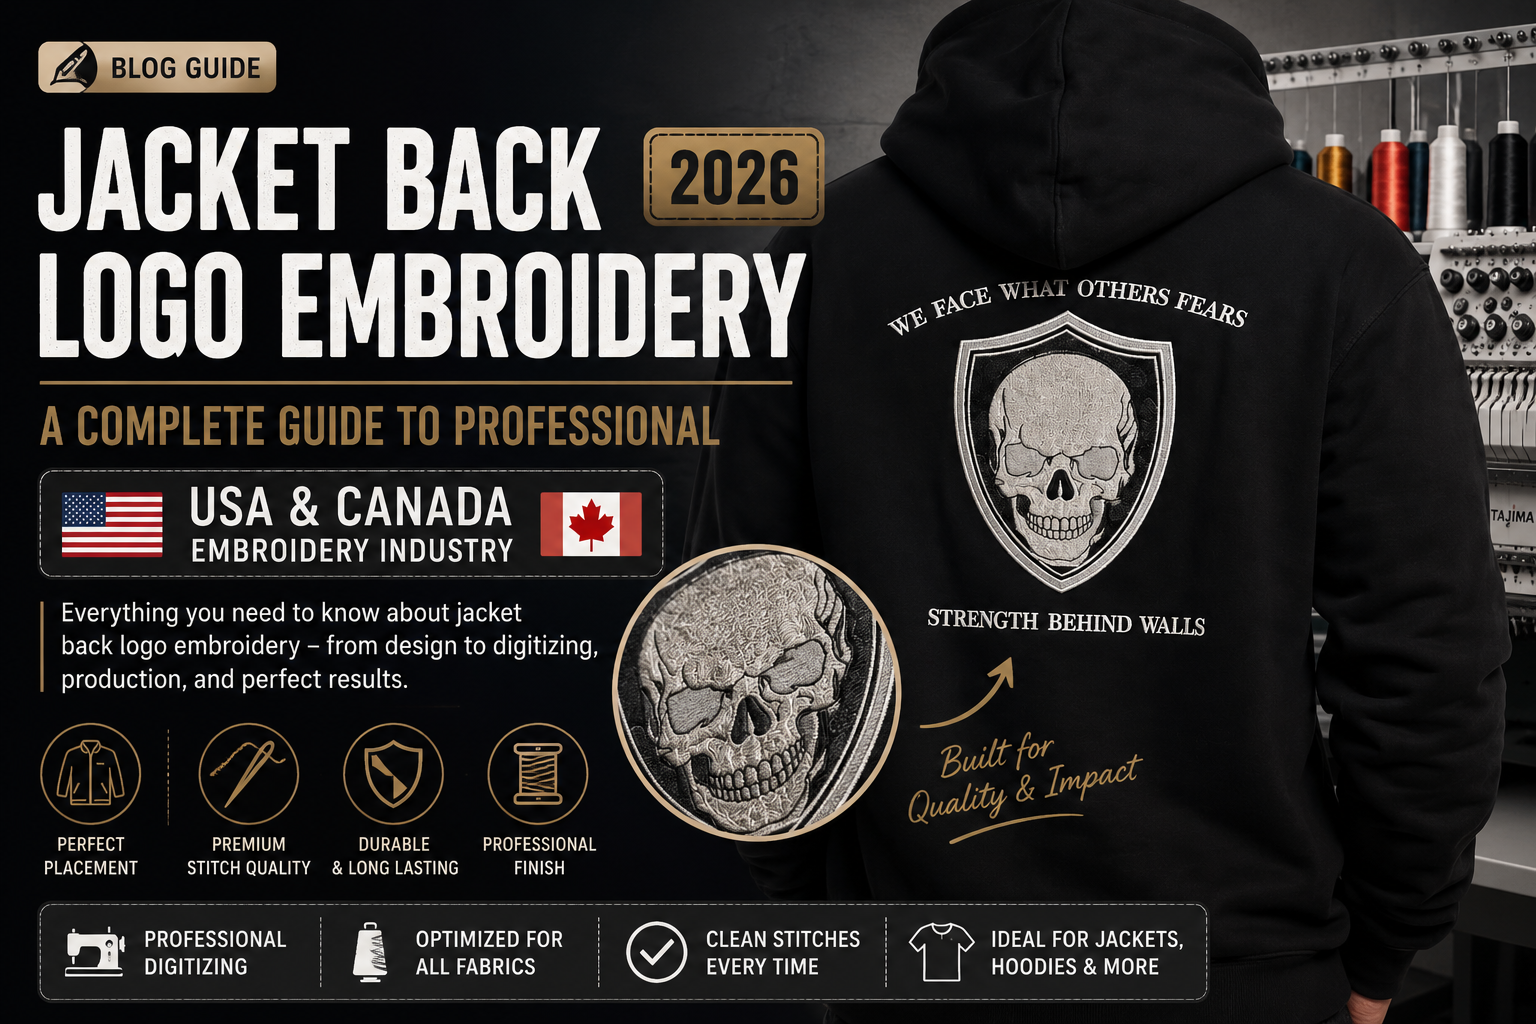
Jacket Back Logo Embroidery: A Complete Guide to Professional Digitizing (USA & CANADA Embroidery Industry)
A professional jacket back logo embroidery can transform a simple jacket into a bold, premium piece. This complete 2026 guide covers design preparation, digitizing, stitch selection, placement, fabric considerations, production techniques, and quality standards for the USA and Canada embroidery industry.
Introduction: Why Jacket Back Embroidery Is Different
A large embroidered logo on the back of a jacket has a completely different visual impact from a small chest logo. It can turn an ordinary jacket into a powerful piece of branding for a company, sports team, motorcycle club, school, fashion brand, or promotional campaign.
But creating a professional jacket-back embroidery design is not simply a matter of taking an existing logo and making it larger.
Large-format embroidery introduces a different set of technical challenges. The design covers a much larger area, contains more stitches, creates greater interaction with the garment, and requires careful control of stitch direction, density, underlay, sequencing and pull compensation.
This is where professional embroidery digitizing becomes essential.
A successful jacket-back design must be created with the final garment in mind from the very beginning.
The digitizer needs to understand not only what the logo looks like, but also:
What fabric will be embroidered?
What size will the design be?
What machine will sew it?
What hoop will be used?
How much detail can realistically be reproduced?
How will the fabric react to thousands of needle penetrations?
Where should the embroidery begin and end?
How should different elements overlap?
How can unnecessary stitches be avoided?
The goal is simple:
Create embroidery that looks professional on the finished jacket—not just on the computer screen.
1. What Makes a Jacket Back Logo So Important?
The back of a jacket provides one of the largest visible areas for branding.
A small chest logo may identify a company, but a large back logo can communicate the entire identity of the brand from a distance.
This makes jacket-back embroidery particularly popular for:
Corporate Workwear
Companies use embroidered jackets for employees, technicians, delivery teams, contractors and field workers.
Sports Teams
Team jackets can feature:
Team names
Mascots
Player names
Numbers
School logos
Championship artwork
Motorcycle & Automotive Brands
Large back embroidery is commonly used for bold club or brand artwork.
Fashion Brands
Large embroidery can become a central design element rather than simply a logo.
Promotional Apparel
Businesses may use embroidered jackets for:
Trade shows
Events
Product launches
Promotional campaigns
Customer gifts
This makes large-format embroidery an important service for commercial embroidery businesses.
2. The Biggest Mistake: Simply Enlarging an Existing Logo
Suppose a customer gives you a 3-inch chest logo.
They then say:
"I want the same logo 11 inches wide on the back of my jacket."
A beginner may simply enlarge the existing embroidery file.
This is often the wrong approach.
When embroidery increases in size, the stitch structure needs to be reconsidered.
A small logo may contain:
Small satin columns
Fine lettering
Short travel paths
Compact fills
At a much larger size, those same structures may create:
Excessive stitch count
Long stitches
Heavy areas
Poor registration
Uneven coverage
Unnecessary thread buildup
A professional digitizer therefore evaluates the design again and determines which parts should be digitized for the new application.
3. Start With the Garment, Not the Logo
One of the most important professional principles is:
Digitize for the garment—not just for the artwork.
Before starting a jacket-back project, gather as much information as possible about the garment.
Ask the customer:
What type of jacket is it?
What material is it?
What is the jacket size?
What finished embroidery size do you want?
What machine will be used?
What hoop size is available?
Which file format is required?
These questions may appear simple, but they can dramatically affect the digitizing strategy.
4. Understanding Jacket Fabrics
There is no universal jacket-back setting.
Different fabrics behave differently under the needle.
Denim
Denim is relatively stable and is frequently used for large embroidery.
It can support substantial designs, but excessive stitch density can still make the embroidered area unnecessarily stiff.
Nylon
Nylon is lightweight and can move during embroidery.
The digitizer must pay particular attention to stabilization and fabric movement.
Fleece
Fleece has a soft, textured surface. Without appropriate underlay, stitches can disappear into the fabric.
Leather
Leather requires special care because needle penetrations remain visible.
Large, unnecessarily dense embroidery may damage the material or create excessive perforation.
Polyester
Polyester jackets can vary considerably in construction. Some are stable while others can move or stretch.
Varsity Jackets
Varsity jackets often combine several materials and may contain thick sections, lining or ribbed areas.
This requires careful planning before production.
5. Artwork Preparation: The Foundation of Professional Digitizing
The embroidery process starts long before the first stitch.
The artwork should be carefully inspected.
Preferred artwork includes:
AI
EPS
SVG
PDF
High-resolution PNG
High-resolution JPG
Vector artwork is particularly useful because shapes and lettering can be examined more accurately.
However, even perfect vector artwork is not an embroidery file.
It still needs to be converted into a stitch structure.
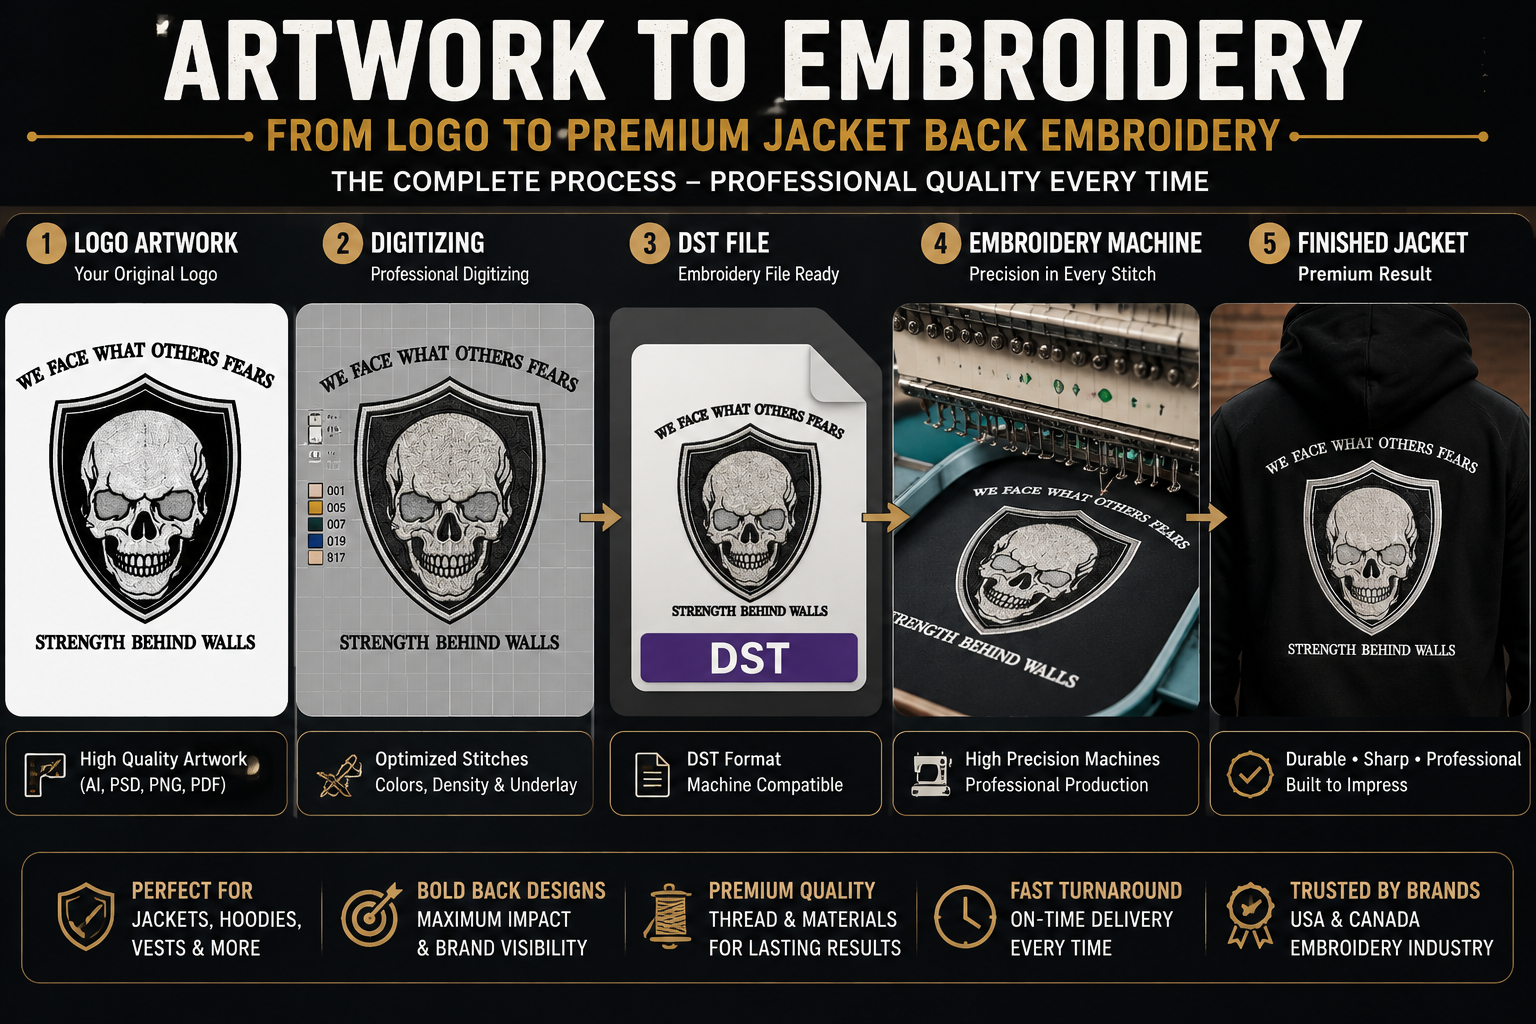
6. What Should Be Simplified?
Not every graphic detail needs to be reproduced exactly.
Consider a logo containing:
Very thin lines
Tiny text
Fine shadows
Gradients
Small gaps
Intricate textures
Some of these elements may not translate effectively into thread.
Professional digitizing sometimes requires controlled simplification.
The goal is not to change the customer's brand.
The goal is to preserve its identity while making it suitable for physical embroidery.
7. Determining the Correct Size
There is no single "perfect" jacket-back size.
The design should be sized according to:
Jacket dimensions
Design proportions
Hoop size
Customer preference
Machine limitations
Placement
For many adult jackets, a large design might fall around the 8–12 inch range, but this should be treated as a starting point rather than a fixed industry rule.
The final size should always be confirmed before digitizing.
8. Design Placement Is More Important Than Many People Realize
Even an excellent embroidery file can look unprofessional if the design is placed incorrectly.
The digitizer or embroiderer should consider:
Collar
Shoulder seam
Center-back seam
Side seams
Pockets
Jacket hem
Existing decoration
The visual center of the artwork is not always the same as the physical center of the jacket.
This is particularly important for jackets with curved backs or shoulder yokes.
9. Stitch Types for Large Jacket Designs
A professional jacket-back design usually combines several stitch structures.
Running Stitch
Useful for fine outlines and delicate details.
Satin Stitch
Excellent for:
Lettering
Borders
Narrow columns
Strong outlines
Fill Stitch
Used for larger areas.
Complex Fill
Useful for broad shapes where stitch direction and pattern need greater control.
The key is not to choose one stitch type for everything.
A professional digitizer chooses the stitch structure according to the shape and intended appearance.
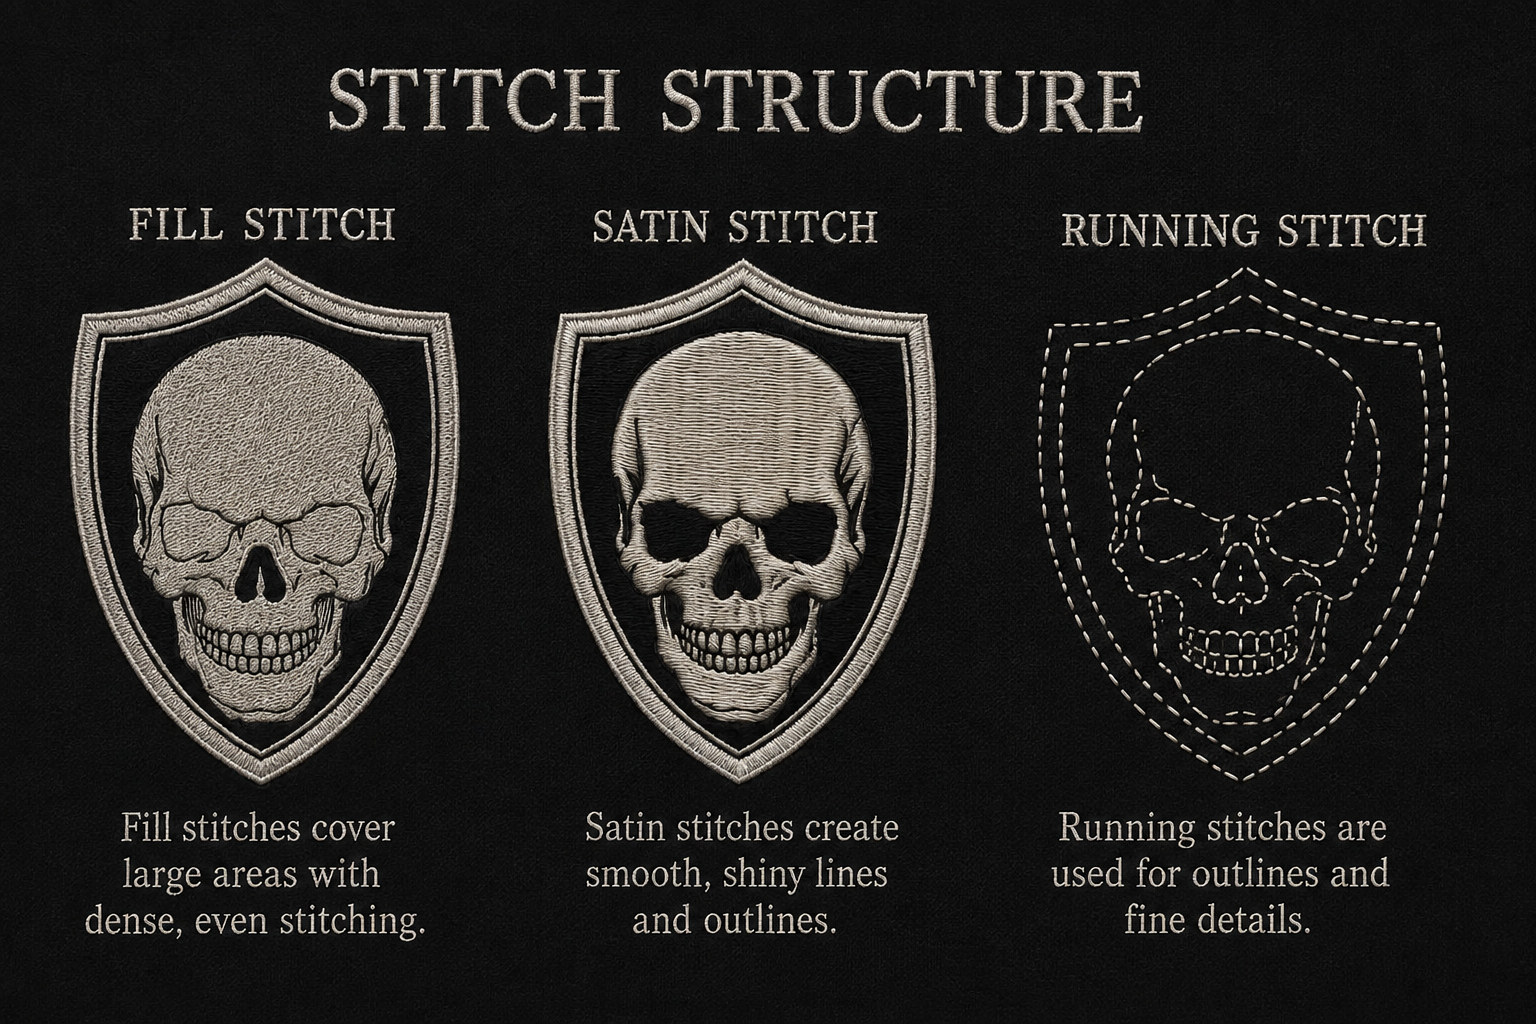
10. Stitch Direction: The Hidden Design Element
One of the easiest ways to identify professional embroidery is to observe stitch direction.
Imagine two adjacent letters.
If both are stitched at exactly the same angle, the design can appear flat.
By changing stitch direction strategically, the digitizer can create:
Contrast
Texture
Dimension
Better visual separation
Stitch direction can also influence how thread tension interacts with the fabric.
Therefore, it should be planned—not automatically generated.
11. The Importance of Underlay
Underlay is the foundation of the embroidery.
It sits beneath the visible top stitches and helps establish a stable base.
Depending on the object and fabric, a digitizer may use structures such as:
Edge run
Center run
Zigzag
Fill underlay
Underlay should be used strategically.
Too little: the top stitches may lack support.
Too much: the design may become unnecessarily bulky.
The correct amount depends on:
Fabric
Object type
Stitch density
Design size
Top-stitch structure
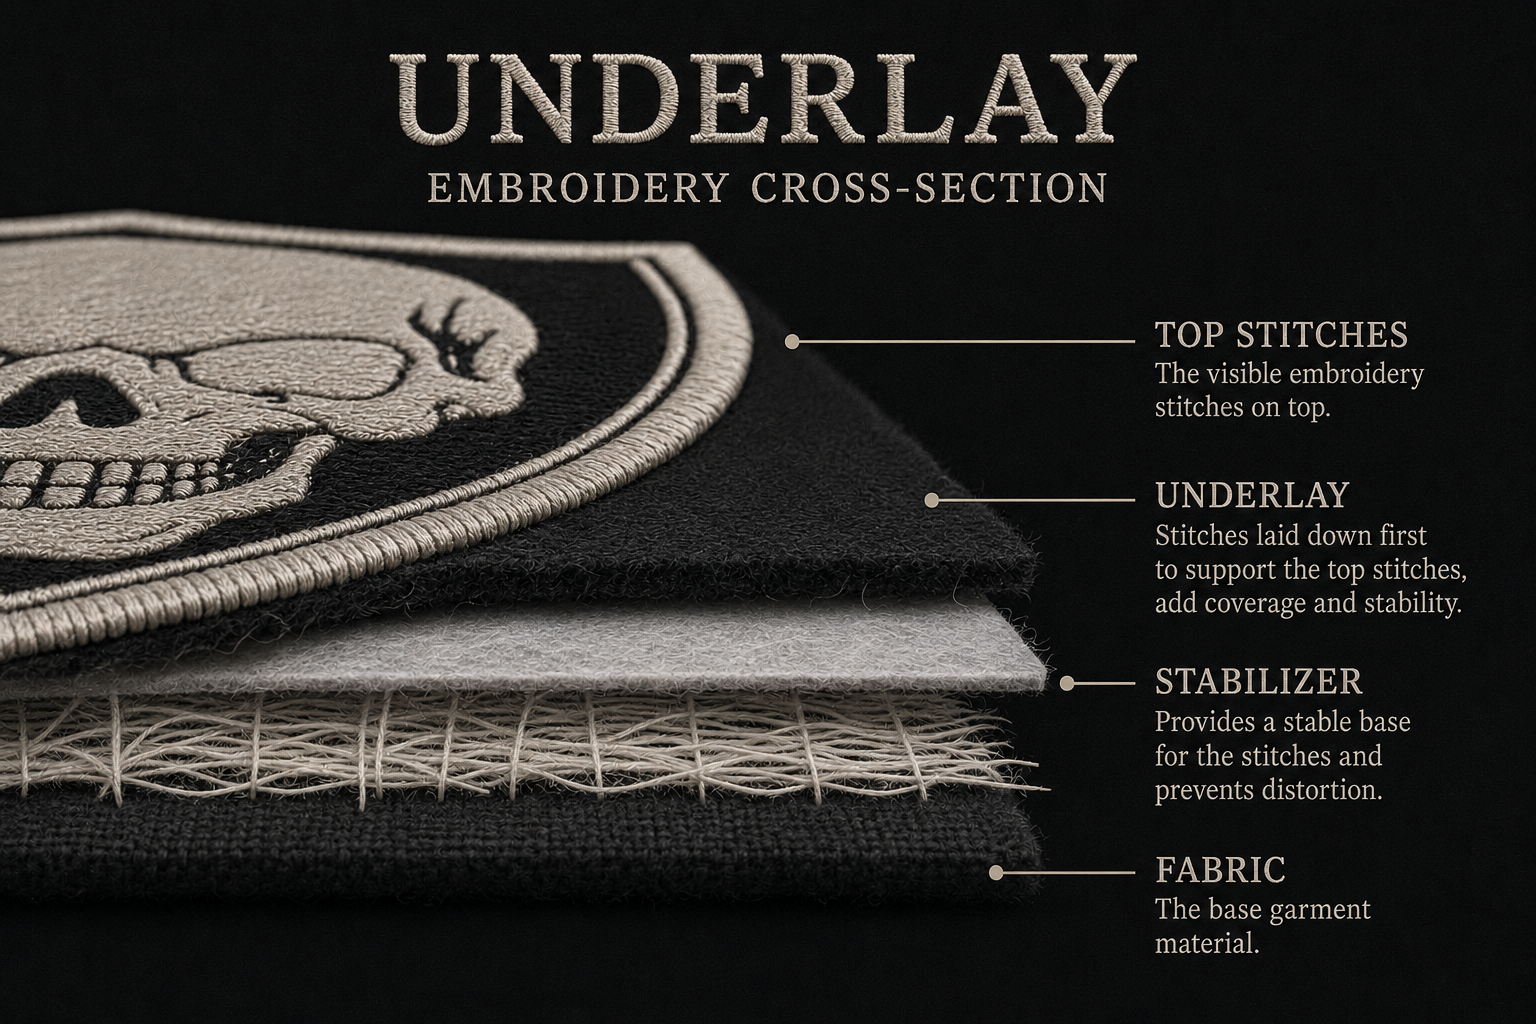
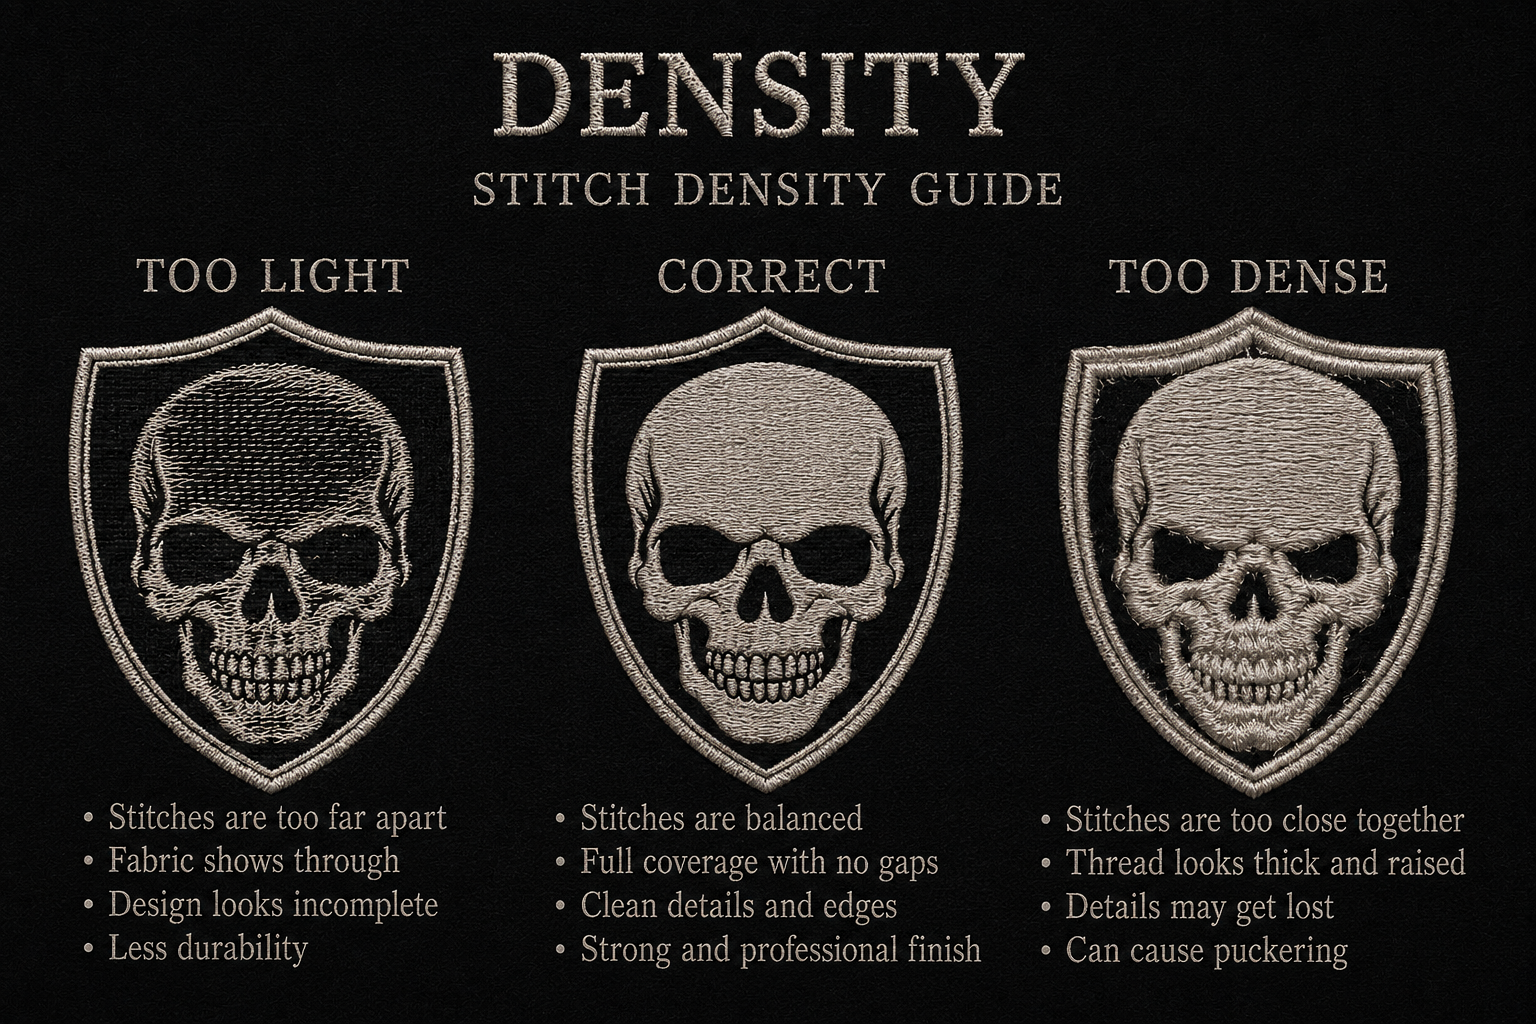
12. Stitch Density: Quality Over Quantity
One of the biggest misconceptions in embroidery is:
"More stitches means better quality."
It doesn't.
A professionally digitized design uses the appropriate number of stitches to achieve the required coverage and appearance.
Excessive density can lead to:
Heavy embroidery
Thread breaks
Needle stress
Fabric distortion
Increased production time
Increased thread consumption
Insufficient density can produce:
Gaps
Weak coverage
Visible fabric
Poor definition
The correct density is therefore a balance, not a maximum number.
13. Pull Compensation and Large Embroidery
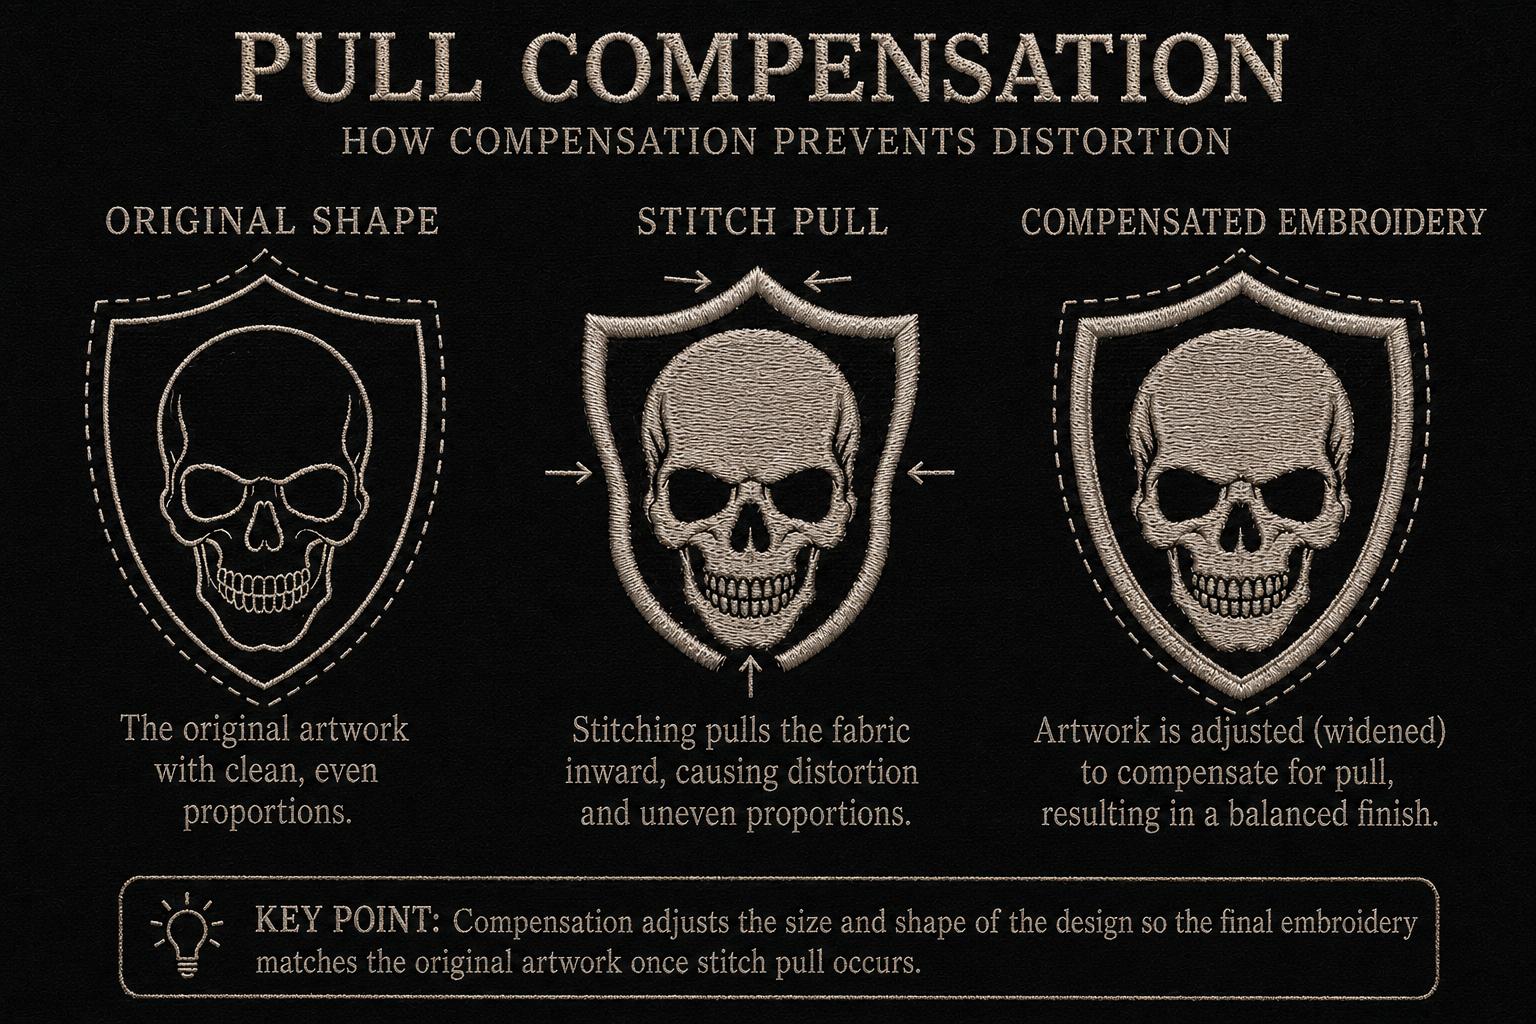
When stitches are placed into fabric, they create tension.
That tension can pull objects inward.
This is why a digitally perfect circle may not produce a perfectly shaped embroidered circle without compensation.
Pull compensation helps the digitizer account for this physical behavior.
It can be particularly important around:
Satin borders
Lettering
Narrow columns
Circular shapes
Large filled objects
The correct amount depends on the fabric and stitch structure.
14. Why Stitch Sequence Matters
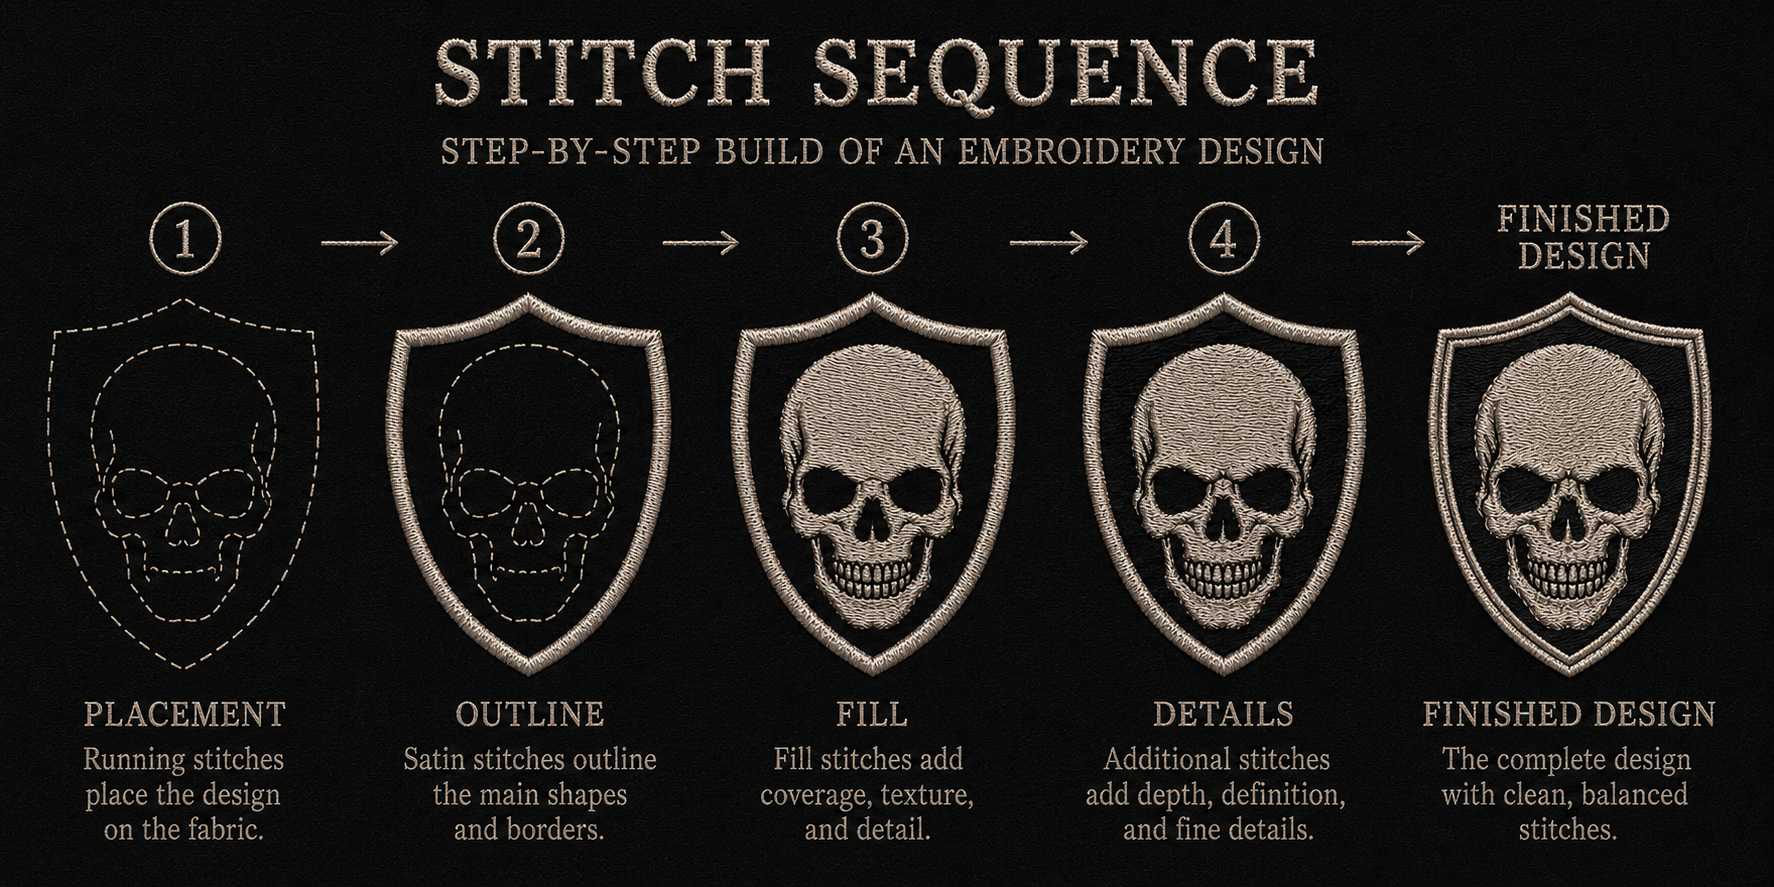
Imagine the machine stitching a large jacket design.
If it jumps randomly between objects, production becomes inefficient and fabric movement can increase.
A professional sequence considers:
Foundation elements
Large background areas
Main objects
Secondary elements
Small details
Lettering
Finishing borders
This is not a universal sequence; every design needs its own plan.
Good sequencing can reduce:
Trims
Jumps
Thread changes
Registration problems
Unnecessary machine movement
15. Registration: Keeping Everything Aligned
Registration means that different parts of the design meet where they are supposed to meet.
For example:
A red fill should meet a black border.
A white letter should remain centered inside a colored shape.
A thin outline should follow the edge of the underlying object.
Fabric movement can cause these relationships to shift.
Professional digitizing uses:
Appropriate sequencing
Overlap
Pull compensation
Stabilization
to minimize visible registration problems.
16. Why Overlap Is Important
Suppose two embroidered objects meet exactly edge-to-edge.
If the fabric shifts slightly, a small gap may appear.
One solution is to allow carefully controlled overlap.
For example:
Background Fill
can extend slightly underneath
Satin Border
This allows the border to remain visually connected even if the fabric moves slightly.
However, excessive overlap can create unnecessary bulk.
Again, balance is essential.
17. Large Fill Areas Require Special Attention
Large jacket-back logos often contain substantial fill areas.
Large fills can create significant stitch counts.
Instead of simply increasing density, professional digitizing can use:
Appropriate stitch spacing
Multiple stitch directions
Efficient underlay
Optimized object shapes
Strategic overlaps
Appliqué where appropriate
This can improve both appearance and production efficiency.
18. Appliqué as an Alternative
Some extremely large designs are better suited to appliqué.
Instead of filling a huge area with embroidery thread, fabric can be used to create part of the design.
Advantages may include:
Lower stitch count
Reduced thread consumption
Reduced embroidery weight
Faster production
Appliqué can be especially effective for large bold shapes.
19. Lettering on Jacket Backs
Large jacket designs frequently include text.
Examples:
COMPANY NAME
MOTORCYCLE CLUB
SPORTS TEAM
EST. 1985
CHAMPIONS
Lettering should be designed specifically for embroidery.
A printed font can contain thin strokes that become unstable when converted into thread.
For embroidery, the digitizer may need to adjust:
Stroke width
Letter spacing
Character size
Stitch direction
Underlay
Pull compensation
20. Choosing the Right Font
Good embroidery fonts generally have:
Strong strokes
Clear openings
Adequate spacing
Simple letterforms
Avoid very thin or highly decorative fonts when the final size is too small.
The customer's brand font can often be adapted while maintaining its recognizable character.
21. Thread Selection
Thread is the visible component of embroidery.
Common commercial embroidery threads include polyester and rayon.
The appropriate thread depends on:
Garment
Desired appearance
Durability requirements
Brand standards
Machine setup
For corporate workwear, durability is often particularly important.
For fashion garments, the visual characteristics of the thread may receive greater emphasis.
22. Needle and Machine Considerations
The embroidery file is only one part of the production system.
The final result also depends on:
Needle
Thread
Machine
Tension
Speed
Hooping
Stabilizer
A good embroidery file can still perform poorly if the machine is incorrectly threaded, tension is unsuitable or the needle is damaged.
This is why troubleshooting should consider the entire embroidery process, not just the digitized file.
23. Stabilization and Hooping
Large embroidery requires controlled fabric movement.
The garment should be hooped or secured correctly according to the production method.
Poor hooping can result in:
Wrinkles
Distortion
Registration problems
Uneven stitching
The fabric should be secure without being unnecessarily stretched.
The goal is to stabilize the garment in a condition that is as close as practical to its natural state.
24. Test Sew-Out: The Most Important Quality-Control Step
A computer simulation is not the finished product.
The real test is the actual stitch-out.
A professional test should evaluate:
Appearance
Does the design look balanced?
Density
Are any areas too heavy?
Registration
Do borders and fills align?
Lettering
Is everything readable?
Fabric
Is the jacket puckering?
Thread
Are there excessive breaks?
Backing
Is the stabilizer appropriate?
Only after evaluating the sample should the file be considered production-ready.
25. Common Jacket Back Embroidery Mistakes
Mistake #1: Using the Same File at Every Size
A chest logo and back logo may require different digitizing.
Mistake #2: Too Much Density
More stitches can actually make embroidery worse.
Mistake #3: Ignoring Fabric
The same file may behave differently on denim and nylon.
Mistake #4: Poor Stitch Sequence
Unnecessary movement can increase production problems.
Mistake #5: Tiny Lettering
Small text often requires special digitizing.
Mistake #6: No Test Stitch
Skipping the test can turn a small digitizing problem into a large production problem.
Mistake #7: Ignoring Hoop Limitations
The final design must fit the actual machine.
26. Large Back Embroidery and Production Efficiency
For commercial embroidery companies, quality is only one part of the equation.
Production efficiency matters too.
A well-optimized design can reduce:
Stitch count
Thread changes
Trims
Jumps
Machine running time
This becomes particularly important for large orders.
If a jacket design requires unnecessary machine movements, the wasted production time can multiply across dozens or hundreds of garments.
Professional digitizing therefore considers both:
Visual Quality
and
Production Efficiency
27. When a Design Needs to Be Split
Sometimes the desired design is larger than the machine's available embroidery area.
In such cases, the design may need to be split into multiple hooping.
This requires extremely careful planning.
The sections must align correctly.
The digitizer must consider:
Split position
Registration
Overlap
Alignment marks
Hoop placement
Sewing sequence
A poorly split design can produce a visible seam between sections.
28. File Formats
Different embroidery machines require different formats.
Common examples include:
DST
PES
JEF
EXP
VP3
HUS
DST is widely used in commercial embroidery, but the customer should always confirm the exact machine requirement.
A professional digitizer should also retain the original editable working file when possible.
29. Professional Quality-Control Checklist
Before delivering a jacket-back file:
Artwork
☐ Correct logo
☐ Correct proportions
☐ Correct colors
☐ Unnecessary details removed
Size
☐ Width confirmed
☐ Height confirmed
☐ Placement confirmed
☐ Hoop confirmed
Digitizing
☐ Stitch types appropriate
☐ Density balanced
☐ Underlay appropriate
☐ Pull compensation applied
☐ Stitch direction planned
☐ Sequence optimized
Production
☐ Stabilizer considered
☐ Thread selected
☐ Needle considered
☐ Machine format confirmed
☐ Test sew-out completed
30. Professional Approach for USA & Canada Customers
If you are offering jacket-back digitizing to customers in the USA and Canada, a professional workflow should begin with questions rather than immediately accepting the artwork.
Ask for:
1. Logo/artwork
2. Jacket type
3. Jacket material
4. Finished embroidery dimensions
5. Machine brand/model
6. Hoop size
7. Required file format
8. Thread color requirements
9. Quantity
10. Photograph of the jacket if necessary
This creates a more professional customer experience and gives the digitizer the information needed to create an appropriate production file.
31. How Professional Digitizing Adds Value
A customer may think they are paying for "a DST file."
But the real value is not the file extension.
The value is the expertise behind the file.
A professional digitizer transforms:
Artwork
into
Production-ready embroidery instructions
while considering:
Fabric + Thread + Machine + Size + Stitch Structure + Production
That is what separates professional embroidery digitizing from automatic image conversion.
32. Final Thoughts
A jacket-back logo is one of the most visible forms of apparel branding.
When properly digitized, it can create a premium appearance that remains attractive through repeated use.
But successful jacket embroidery does not happen by accident.
It requires a combination of:
Good Artwork
Correct Sizing
Fabric Knowledge
Professional Stitch Planning
Controlled Density
Proper Underlay
Pull Compensation
Efficient Sequencing
Correct Stabilization
Real-World Testing
The most important principle is this:
A professional embroidery file is designed for the garment, not simply converted from artwork.
Whether the customer needs a large company logo on a work jacket, a team design on a varsity jacket, a motorcycle emblem on denim, or a fashion graphic on premium outerwear, the digitizing strategy should always begin with the final embroidered result in mind.
Frequently Asked Questions
What is the best size for a jacket back logo?
There is no single universal size. Many adult jacket-back designs are approximately 8–12 inches wide, but the correct size depends on the jacket, design proportions, hoop, and desired appearance.
How many stitches does a jacket-back logo need?
Stitch count varies dramatically depending on size, design complexity, density, stitch type, and fabric. Stitch count should be optimized rather than targeted at a fixed number.
What is the best file format for jacket embroidery?
DST is widely used in commercial embroidery, but the correct format depends on the embroidery machine. Brother machines may require PES, Janome machines commonly use JEF, and other machines may require different formats.
Can a small logo be enlarged for a jacket back?
Sometimes, but simply enlarging the design is not recommended. The design may need to be re-digitized at the larger size because stitch density, stitch lengths, underlay, and sequencing can all change.
Why does my large jacket logo pucker?
Puckering can result from excessive density, inadequate stabilization, poor hooping, incorrect underlay, excessive tension, or unsuitable digitizing.
Can I use the same embroidery file for a jacket and a polo?
Not always. Different fabrics and garment constructions can require different digitizing settings. A production file should ideally be optimized for its intended application.
Why is my jacket embroidery too heavy?
Excessive stitch density, unnecessary underlay, overlapping objects, or inefficient digitizing can create excessive stitch buildup.
Should a jacket logo be embroidered directly or made as a patch?
Both methods can work. Direct embroidery provides an integrated premium appearance, while patches can be useful for certain fabrics, oversized designs, or specific production requirements.
Tags: